Saturday, December 4, 2010

Music Paper Book Shelf

I found this very blue bookshelf at the Goodwill for $8. I needed a shelf for the store where I sell my stuff. It sat in my garage for about 5 weeks once I realized that blue paint was so thick there was no way I was going to be able to sand it. Here is the before:


 I primed with a brush(one coat)  and then painted with Behr Snow Powdered white(2 coats). I decided midway that I was going to modge podge  some old music sheets to the back.

I won the Altar'd Painting Guide over at Twice Lovely and it's very helpful in painting. When you're new to this, trial and error can be pricey! They give a very detailed list of what you need and they were so quick to respond to my questions I still had after reading it. I definatly recommend it:)

I'll be linking up to the parties below:
Krista

Thursday, November 25, 2010

Galvinized Tin Redo

So I bought this galvanized tin container at the Goodwill for 2.50 and I had plans of painting and distressing it like Miss Mustard Seed. She's given a tutorial on it which I could do for the most part. The problem? I can't paint the numbers free hand and I don't own number stencils. So it sat in my kitchen for about a month. And then I got the idea while making music sheet snow flakes(a tutorial is coming) to cover it with sheet music.
My favorite part of the tin was the detail on the handles...

So I began tearing sheet music and arranging. I just covered sections of the tin in Modge Podge,placed the music and once it dried I put another coat of Modge Podge over the entire thing. 
Here she is finished. 
And here she is with glitter letters I had made. This project was so easy I'm now on the lookout for more galvanized pails.

Hope you have a wonderful Thanksgiving!

Krista

I'm linking up to:

Monday, November 15, 2010

Pumpkin Bundt Cake

My girls love to make this pumpkin bundt cake for Halloween and Thanksgiving. I tried to take pictures as we went along but I'm still trying to get the hang of remembering to take a picture at every step.

We started with a bundt cake pan prepared with oil and flour. We followed the directions on the pumpkin bread from Trader Joe's. The most time consuming part of this is that you have to make 2 pumkin bundt cakes and I only own 1 pan.
The girls were excited that they got to lick the bowl twice...it was Halloween so I thought why not start the sugar high a little early:)
Once both of the cakes were cooled I cut off the tops and put a layer of frosting on the tops and put them on top of each other(that part I don't have a picture of:(
We added orange frosting and dusted a sugar cone with heated caro syrup(30 seconds in the microwave) and brown sugar for the branch coming out of the pumpkin. I have a confession to make...
I forgot to take a picture before we took it to the party and everyone dug in! This is what was left so I just made do:) The kids love our tradition of making this cake...it's a little time consuming with both cakes but you could bake them the day before and frost the next day.
I'm linking to the following parties...


Tuesday, November 9, 2010

Fleur de lis Cork Board

Most of the things I attempt to do are things I've seen on other blogs and fallen in love with and just have to try. This was one of my few original ideas. I started off with a frame I found at the Goodwill for a dollar. I tore it apart and sanded it. I was about to spray paint the frame black(I literally had it out back with the can in my hand ready to spray when I took a closer look at the frame and realized I really liked it the way it was. This is a departure for me since the first two of these I made(and sold without taking a picture...ugh!) were painted black.
$1 Frame
I also found a corkboard at the Goodwill for a dollar and it happened to fit perfectly. Usually I have to cut it with a box cutter. I cut a piece of burlap to cover the corkboard. I used a  Fleur de lis stencil and painted it black on burlap.
Once I was done with the burlap I glued it to the corkboard(lots of burned fingers:)
And here is the finished product!

I am linking up to the following parties:


Thursday, November 4, 2010

Goodwill Hunting

I love going to the Goodwill. I like it so much I almost named my blog Goodwill Huntings. It's like a treasure hunt...looking for the gems among the rubble. Today I found a treasure. My husband gave a big sigh as we pulled it out of the back of my car. This baby is HEAVY! But I think he was sighing in a way of "our garage is already full of projects you haven't finished...how long is this going to sit before you start it?" We have a 3 car garage and not a single car parked in it. I know. It's bad. So here are the pictures(taken at night...once again, I can't wait for the morning).
Isn't she pretty?! I can't decide what to do with her yet. Any ideas?
I love the cedar lining. It's in perfect condition,just needs a good cleaning.
O.K. So here's the bad part...the top has some damage. My husband reminded me that we are not wood workers. 
And the top has some water damage. But I still love her. I couldn't pass her up. I better get working though, so my husband doesn't start griping:)

Krista


Tuesday, November 2, 2010

Antique Swivel Chair Refinish

A few months ago I found  the cutest chair refinish at Freckeled Laundry and ever since I've been on the hunt for a swivel chair to refinish. The first one I found is the picture below. It sat in my garage for a few weeks because I dreaded sanding it. I was lucky enough to find a second chair at the Goodwill that was so worn it barely needed any sanding(I'm lazy that way:).  I was so excited to get started that I forgot to take a before picture so I just threw up the chair that still remains in my garage.


I'm thinking about using this chair in my office because I really don't want to sand it!


The ruffle is made out of drop cloth. I'm not sure I'm crazy about it. I can easily remove it because I just used a staple gun. Here it is close up...
This picture was taken at night...I forgot to take a close up during the day...I'm still trying to get it all together will this blogging thing:) What do you think...ruffle or no ruffle?

Go check out the original at Freckled Laundry. She goes through it step by step. I also made a rosette like hers but opted to not put it on.
www.freckledlaundry.com/2010/06/antique-swivel-office-chair-refinish.html

I'm going to be linking up...
www.thriftydecorchick.blogspot.com
www.sassysites.blogspot.com
www.mustardseed.blogspot.com
www.shabbynest.blogspot.com
www.freckledlaundry.com
www.remodelaholic.com
www.chiconashoestringdecorating.blogspot.com
http://craftomaniac.blogspot.com
http://craftskeepmesane.blogspot.com
http://thegirlcreativepartyblog.blogspot.com


Have a great rest of the week!

Krista

Thursday, October 28, 2010

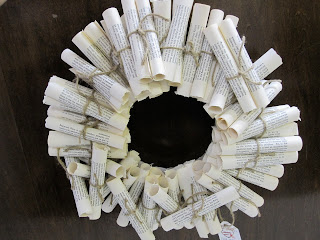
Book Wreaths


So I was loving all of the book wreaths...I really liked the post on Jones Design Company. I actually made 2 different wreaths that she didn't make but had pictures of on her tutorial post. They are pretty easy to make...but time consuming. Check out her tutorial if you're interested. She's having a wreath party I'm going to link up to. The wreath picture was taken in the store where I sell my goods hence the random wallpaper backround:) Which wreath do you like the best? I think I like the top one. (I'm just learning how to use Picasa thanks to the super EASY tutorial by Little Miss Momma so bear with me:)

Krista

www.jonesdesigncompany.com

Go check out all of the great book wreaths!

Tuesday, October 26, 2010

Mustard Seed Painted Sign

I am a huge fan of Miss Mustard Seed Creations blog. I love everything she does and try many of her tutorials. I tried my hand at my first sign. I had seen this quote at a store called The Embellished Home in North Scottsdale. This place is full of so many treasures and wonderful ideas! (Unfortunately it is very expensive!).

I don't have the steadiest hand when it comes to painting things small so I used the trick of pencil on the back of the picture and transferring it by tracing it. I got the crown image from The Graphics Fairy. I got the old sign from the Goodwill for $1. I think it turned out pretty good. The only thing I'm struggling with is the streaks in my stain that I put over it to age it. I'm not sure why it didn't take as strong in certain areas. Oh well, not bad for my first effort:) Head over to Mustard Seed Creations for the tutorial...it was a lot of fun!

I'm going to try and link up to some parties(if I can figure this linking thing out!)

www.todayscreativeblog.net
www.missmustardseed.blogspot.com
http://funkyjunkinteriors.blogspot.com
http://cottageinstincts.blogspot.com
www.graphicsfairy.blogspot.com
www.diyshowoff.blogspot.com
www.thriftydecorchick.blogspot.com

Krista

Monday, October 18, 2010

What's In A Name?

I remember when we had our first baby girl...it was so hard to pick a name without seeing her and getting a feeling for her personality. That's how I feel about naming my blog. I don't know what its personality and purpose is yet. My husband wanted me to name it "The Garage Project". I've taken over the garage with all of my furniture redos. Much to his dismay, most everything in there has a fine mist of Heirloom White spray paint all over it(including his new golf bag)! I've read so many blogs that have brought so much useful information into my world I thought maybe I could make a play on their name. I could be "Ms. Peppercorn" (ala Ms. Musterseed Creations), "The Lettered Scottsdale House" (The Lettered Cottage), C Krista Enjoy It (C Jane Enjoy It), "Pennywise Girl" (Centsational Girl) and last but not least "The Krista Dialogues" (Nie Nie Dialogues). None of them are me. So after much thought and attempts at play on words I simply decided on Blissful Craziness because it describes my life best at the moment. Blissfully happy with my family and Crazy with our life and activities. Adding this blog to my life will add to both my bliss and craziness and I welcome it with open arms:)